Using the awesome tools that Stripe provides, integrating billing into your application has never been faster. This post demonstrates a very quick method of integrating Stripe while still maintaining a custom look and feel.
The general game plan is as follows:
- Add a custom subscription/checkout form to the onboarding process.
- Add webhooks which monitor the status of your customers’ subscriptions.
- Use the Stripe Customer Portal to allow your customers to update their billing preferences.
This post is intended to be an concise overview of the integration. As such, I will omit some of the “glue” code (controller actions, routes, access control, etc).
Creating Products/Plans
To begin, I navigated to the Products page in Stripe and created one Product with two different Prices: one for monthly and one for yearly subscriptions.
To capture this in the Rails app, I simply hard-coded the plan details for now. There are more sophisticated ways of doing this, such as querying the product data from Stripe and storing it in the database, but that is beyond the scope of this project.
require 'ostruct'

class SubscriptionPrice
  MONTHLY_20 = OpenStruct.new({
    id: 'price_1HXTMsB5y*****',
    name: "monthly-20",
    amount: 3000,
    currency: "usd",
    interval: "month",
  })

  YEARLY_220 = OpenStruct.new({
    id: 'price_1HXTMs*****',
    name: "yearly-220",
    amount: 22000,
    currency: "usd",
    interval: "year",
  })

  def self.current_monthly
    MONTHLY_20
  end

  def self.current_yearly
    YEARLY_220
  end
end
Now, elsewhere in the codebase, I can simply call SubscriptionPrice.current_monthly or SubscriptionPrice.current_yearly and get details about the current subscription offerings.
Database modeling
The application that I’m working on will have the subscriptions tied to a Team (rather than an individual user). There are two items that we need to keep track of for each Team: The Stripe Customer and the Subscription.
The Stripe Customer record contains references to the credit card used for the subscription, so we’ll store the ID in the Team table so that we can allow a team member to update their subscription preferences.
As far as the Subscription goes, we’re storing some basic information: the id, status, when the current period ends, whether it will renew, etc.
class AddSubscriptions < ActiveRecord::Migration[6.0]
  def change
    create_table :subscriptions, id: :uuid do |t|
      t.text :external_id, null: false, default: ""
      t.belongs_to :team, foreign_key: true, null: false, index: true, type: :uuid
      t.text :status, null: false
      t.boolean :cancel_at_period_end, null: false, default: false
      t.datetime :current_period_start, null: false
      t.datetime :current_period_end, null: false
      t.timestamps null: false
    end

    add_column :teams, :stripe_customer_id, :text
  end
end
The Subscription model looks something like this for now:
class Subscription < ApplicationRecord
  belongs_to :team

  enum status: {
    trialing: 'trialing',
    active: 'active',
    past_due: 'past_due',
    canceled: 'canceled',
  }

  ACCESS_GRANTING_STATUSES = ['trialing', 'active', 'past_due']
  validates :external_id, presence: true

  scope :active_or_trialing, -> { where(status: ACCESS_GRANTING_STATUSES) }
  scope :recent, -> { order("current_period_end DESC NULLS LAST") }

  def active_or_trialing?
    ACCESS_GRANTING_STATUSES.include?(status)
  end
end
Building the checkout form
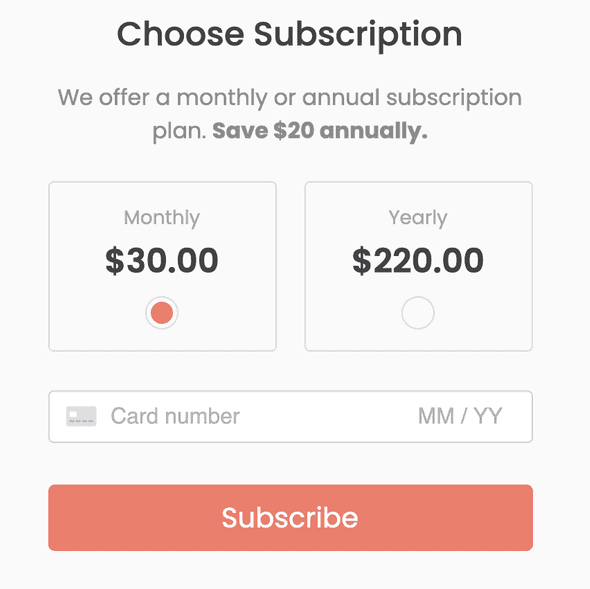
We’ll be building the checkout form with Stripe.js and Stripe elements (docs). Here’s what the form looks like:
First, lets take a look at the salient parts of the from HTML (this project is using Haml). I’m also using Stimulus, but it’s really only used for selecting HTML elements, and you could easily do this with vanilla JS. Finally, I’m using the Ruby money gem here for formatting the prices.
= form_tag team_subscriptions_path(current_team), method: :post, data: {controller: "subscribe-form"} do |f|

  - #
  - # This element inserts the Stripe publishable key so that we can grab it in the JavaScript
  - #
  %div{"data-target" => "subscribe-form.stripePublishableKey", "data-stripe-publishable-key" => ENV["STRIPE_PUBLISHABLE_KEY"]}

  - #
  - # Here are the two different pricing options
  - #
  .subscription-options
    %label.subscription-option
      .option-name Monthly
      .option-price= Money.new(monthly.amount).format
      = radio_button_tag "stripe_price_id", monthly.id, params[:stripe_price_id].blank? || params[:stripe_price_id] == monthly.id
    %label.subscription-option
      .option-name Yearly
      .option-price= Money.new(yearly.amount).format
      = radio_button_tag "stripe_price_id", yearly.id, params[:stripe_price_id] == yearly.id

  - #
  - # Here's where we'll render the Stripe Elements credit card field, as well as a div
  - # for an error and a hidden input to store the credit card token.
  - #
  %div{"data-target" => "subscribe-form.cardInput"}
  .text-danger.mb-4.d-none{"data-target" => "subscribe-form.cardError"}
  = hidden_field_tag 'card_token', params[:card_token], "data-target" => "subscribe-form.cardTokenInput"

  .actions
    = submit_tag "Subscribe", class: 'btn btn-lg btn-block btn-snippets', data: {target: "subscribe-form.submit"}
Next, lets look at the JavaScript for the form. It has a few primary responsibilities:
- Initialize Stripe and render the Stripe Elements Card input.
- On form submit, attempt to tokenize the credit card number
- If the tokenization is successful, add the token to the hidden input in the form
- If the tokenization fails, display the error message.
Again this uses stimulus.js, but don’t be discouraged by that. This could easily be adapted to vanilla JS.
export default class extends Controller {
  static targets = ['stripePublishableKey', 'cardInput', 'cardTokenInput', 'cardError', 'submit']

  connect() {
    const form = this.element

    //
    // Fetch the stripe publishable key from the HTML element
    //
    const publishableKey = this.stripePublishableKeyTarget.dataset.stripePublishableKey

    const stripe = Stripe(publishableKey)
    const elements = stripe.elements()

    const clearCardError = () => this.cardErrorTarget.classList.add('d-none')

    //
    // Initialize the card number element
    //
    const cardElement = elements.create('card', { ...STYLE_ATTRS })
    cardElement.mount(this.cardInputTarget)
    cardElement.on('change', clearCardError)

    //
    // Add an on-submit listener for the form
    //
    form.addEventListener('submit', async e => {
      e.preventDefault()
      this.submitTarget.setAttribute('disabled', '')

      //
      // Attempt to tokenize the card number
      //
      const result = await stripe.createToken(cardElement)

      if (result.error) {
        //
        // On error, display the error message.
        //
        console.log('got error!', result.error)
        this.cardErrorTarget.classList.remove('d-none')
        this.cardErrorTarget.textContent = result.error.message
        this.submitTarget.removeAttribute('disabled')
      } else {
        //
        // On success, add the token to the hidden field and submit to the server
        //
        console.log('got token!', result.token)
        this.cardTokenInputTarget.value = result.token.id
        form.submit()
      }
    })
  }
}
If all goes well, when you input a Stripe test card number, the tokenized card information and the subscription plan ID should be submitted to your controller action.
Creating the Customer and Subscription in the Rails controller
Now that we’ve got tokenized credit card information and a selected pricing plan, we can create the subscription. The controller action looks like this:
  def create
    manager = SubscriptionCreator.new(
      price_id: params[:stripe_price_id],
      card_token: params[:card_token],
      team: current_team,
    ).call

    if manager.success?
      redirect_to root_path
    else
      flash.now[:alert] = manager.error
      render :new
    end
  end
As you can see, most of the logic occurs in another class, SubscriptionCreator. For simplicity, errors that occur at the controller level are dropped into a flash message:
Now onto the code for SubscriptionCreator. It does the following:
- Creates (or updates) a Stripe Customer for the team. This, again, holds the credit card information.
- Creates a subscription.
- Handles errors as necessary.
The stripe-ruby API client is used for the calls to Stripe.
class SubscriptionCreator
  class HasActiveSubscriptionError < StandardError; end

  attr_accessor :error

  def initialize(team:, price_id:, card_token:)
    @team = team
    @price_id = price_id
    @card_token = card_token
  end

  def call
    create
    self
  end

  def success?
    error.nil?
  end

  private

  #
  # This method creates a customer and then a subscription.
  # It is also responsible for catching and storing errors.
  #
  def create
    customer = create_or_update_customer
    create_subscription(customer)

  rescue HasActiveSubscriptionError => e
    self.error = 'Team already has active subscription.'
  rescue Stripe::CardError => e
    puts [e.message, *e.backtrace].join($/)
    self.error = e.message
  rescue StandardError => e
    puts [e.message, *e.backtrace].join($/)
    self.error = "Error creating subscription.  Please contact customer support."
  end

  def create_or_update_customer
    customer = nil

    # lock the team to try to prevent multiple records from being
    # created on the stripe side.
    @team.with_lock do
      customer_params = {
        source: @card_token,
      }

      #
      # if the team already has an associated Stripe Customer, we will update it.
      #
      if @team.stripe_customer_id
        customer = Stripe::Customer.update(@team.stripe_customer_id, customer_params)
      #
      # Otherwise, we create a new Customer with the associated credit card info.
      #
      else
        customer = Stripe::Customer.create(customer_params)
        #  Store the customer_id on the Team for later use
        @team.update!(stripe_customer_id: customer.id)
      end
    end

    customer
  end

  def create_subscription(customer)
    # If the team already has a subscription, raise an error.
    if @team.has_active_subscription?
      raise HasActiveSubscriptionError.new
    end

    @team.with_lock do
      # Create a new subscription with Stripe, and store the details in the database
      stripe_sub = Stripe::Subscription.create(
        customer: customer.id,
        items: [{price: @price_id}],
        trial_from_plan: true,
      )

      subscription = Subscription.new(external_id: stripe_sub.id, team: @team)
      subscription.assign_stripe_attrs(stripe_sub)
      subscription.save!
    end
  end
end
In Subscription, I created a method that takes the Stripe subscription info and converts it into something that we can store in the DB:
  def assign_stripe_attrs(stripe_sub)
    assign_attributes(
      status: stripe_sub.status,
      cancel_at_period_end: stripe_sub.cancel_at_period_end,
      current_period_start: Time.at(stripe_sub.current_period_start),
      current_period_end: Time.at(stripe_sub.current_period_end)
    )
  end
Now your users can create subscriptions and the relevant information is stored in the database.
Adding webhooks to monitor subscription status
The next step is to set up create a controller action to handle incoming Stripe webhooks. This will notify your server of updates that occur to subscriptions. Here’s some sample code:
module Api::Webhooks
  class StripeController < BaseController
    def webhook
      event = nil

      begin
        #
        # This is important because it confirms the authenticity of the webhook.
        #
        event = Stripe::Webhook.construct_event(
          request.body.read,
          request.env['HTTP_STRIPE_SIGNATURE'],
          ENV['STRIPE_WEBHOOK_SECRET'],
        )
      rescue JSON::ParserError => e
        head 400
        return
      rescue Stripe::SignatureVerificationError => e
        head 400
        return
      end

      #
      # Handle various events.  There are many more, but these are the essential ones.
      #
      case event.type
      when 'invoice.payment_succeeded'
        invoice = event.data.object
        subscription = Stripe::Subscription.retrieve(invoice.subscription)
        update_database_subscription(subscription)
      when 'invoice.payment_failed'
        invoice = event.data.object
        subscription = Stripe::Subscription.retrieve(invoice.subscription)
        update_database_subscription(subscription)
      when 'invoice.created'
      when 'customer.subscription.deleted'
        subscription = event.data.object
        update_database_subscription(subscription)
      when 'customer.subscription.updated'
        subscription = event.data.object
        update_database_subscription(subscription)
      else
        puts "Stripe webhooks - unhandled event: #{event.type}"
      end

      head 200
    end

    private

    #
    # Use the same method that we wrote for create new subscriptions to update the
    # subscription data, so that it's always formatted consistently.
    #
    def update_database_subscription(stripe_sub)
      subscription = Subscription.find_by!(external_id: stripe_sub.id)
      subscription.assign_stripe_attrs(stripe_sub)
      subscription.save!
    end
  end
end
To test webhook events, I like to use Stripe CLI to temporarily forward webhook events to my local server:
 stripe listen --forward-to localhost:3000/api/webhooks/stripe
> Ready! Your webhook signing secret is whsec_u0z9k*******fjY (^C to quit)
Then I can make changes to subscriptions in the stripe dashboard (or whatever) and watch the events flow into my local server. Note, you’ll have to update the webhook secret ENV var each time you restart this command.
Integrating the Stripe Customer Portal
The Stripe Customer Portal is a newish Stripe feature that provides customers with a dashboard to manage their subscriptions. This is great, because customers get subscription management and billing history tools at the cost of very little development time.
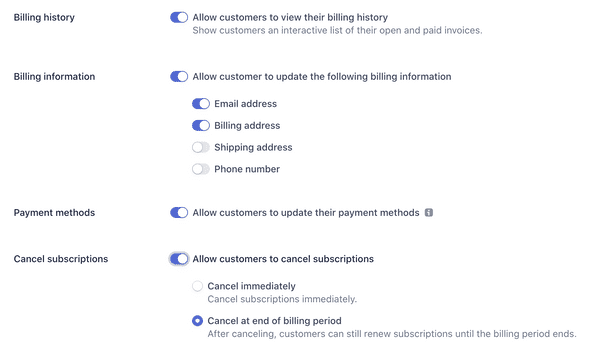
The customer portal can be configured in various ways:
To integrate the customer portal, all we need to do as add a new controller action which redirects the user to the portal:
  def manage
    authorize current_team, :update?

    portal = Stripe::BillingPortal::Session.create({
      customer: current_team.stripe_customer_id,
      return_url: root_url,
    })

    redirect_to portal["url"]
  end
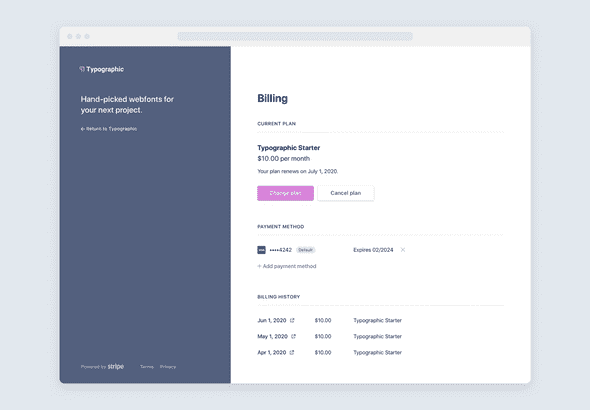
Be sure to include some authorization here so that you only allow users to visit portals that they’re entitled to see. The customer portal can be branded, and will look something like this:
All done!
As I hope you can see from this post, creating a fully featured subscription/billing system for your app has never been easier. This is a great method to use for early-stage projects where you want to focus on the core elements of the app rather than billing.
Need help with your Stripe integration?
Hire me: Tanooki Labs (my employer) can help with design and development of your project!


