Last year, CloudFlare introduced Universal SSL. This is awesome, because it mitigates several annoyances when dealing with SSL:
- The cost (of both Heroku’s SSL endpoint addon and the cert itself)
- The back and forth interaction with clients that is required to buy and set an SSL certificate
- Cert expirations
Of course, this setup won’t work with every project. There are some downsides to not being in complete control of your SSL cert, and sometimes you may not want to have your DNS on CloudFlare. For the most part, though, I can see this being quite useful!
Transfer your DNS to CloudFlare
First of all, we’ll need to transfer the DNS to CloudFlare. If you don’t already have a CloudFlare account, go ahead and create one. Once you’ve created your account, you’ll want to add the domain in question to CloudFlare.
As a side note, I’m going to be setting up a “bare” (without “www”) domain, i.e. “mydomain.com”. If you would like the “www”, the setup is mostly the same, but you’ll need to tweak the DNS a bit as appropriate.
Follow the new domain onboarding process. You’ll want to set up your DNS something like this (of course, you may have other records as well):
If you plan to use a CloudFlare page rule to redirect www to non-www (more on this later), you MUST have the www subdomain routed explicitly through CloudFlare.
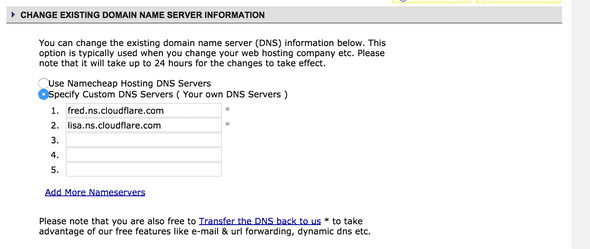
You’ll also need to log into your domain registrar and redirect the DNS to the addresses specified by CloudFlare. I use NameCheap, and it looks something like this:
CloudFlare SSL Setup
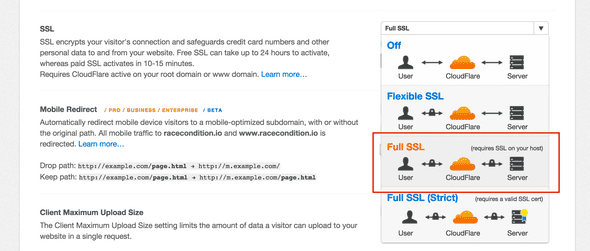
Under the CloudFlare Settings page for your domain, you’ll need to be sure that the SSL type is set to Full SSL:
With this, you’ll be using CloudFlare’s SSL cert between the user and CloudFlare’s servers, and you’ll be using Heroku’s SSL cert between the CF servers and the Heroku servers.
Heroku Domain Name Setup
Within Heroku’s control panel, you’ll need to add your domain name:
Note: Just to reiterate, do not need the Heroku SSL endpoint addon.
Adding a Page Rule (optional)
Next up, I added a CloudFlare Page Rule to redirect www requests to non-www.
This is a fowarding page rule that redirects any www requests, while preserving the latter part of the URL.
If your application is not forcing all requests to go through SSL, you can also add a page rule here to redirect http requests to https.
The Waiting Game
Now, you’ll need to wait about 24 hours for everything to go through. DNS transfers can take some time, and I believe that CloudFlare specifically imposes a 24 hour wait time for free SSL certs.
If you do all of these steps, and things are looking weird, I’d recommend just waiting about 24 hours before attempting to debug.
That’s it!
Now you can kick back and enjoy your extra $290 per year ($20 x 12 for Heroku’s SSL endpoint and $50 per year for an SSL cert). Spend it all in one place!
I did this mostly from memory, so if I missed any steps please let me know.
If you enjoyed this post, please let me know on twitter @bolandrm, and/or use the form below to subscribe to my mailing list! Thanks for reading!


Hi, I have a doubt why do you say it is necessary to add the domain to heroku? it does not have sense since in the previous step you said to add Name servers of Cloudflare in the domain registrar; so why add the domain in heroku? is it really necessary? and why?
Yes - I believe it's necessary, because Heroku does a check to make sure that the domain your using is authorized on the app.
Setting up SSL (Secure Sockets Layer) for your website is crucial for ensuring a secure and trusted browsing experience. The combination of Heroku and Cloudflare offers a powerful and straightforward solution for obtaining free SSL certificates and enabling HTTPS on your Heroku-hosted application.
I get a privacy error when doing this. Does this still work?
"This server could not prove that it is www.example.com; its security certificate is from *.herokuapp.com. This may be caused by a misconfiguration or an attacker intercepting your connection."
Does the article assume a paid Heroku plan or works with a free dyno?
Cool, you've got updates here. I wonder if you would continue your casts with the topic SaaS ?
I am confused about enabling full ssl. From my understanding, to be able to do full ssl, your heroku also need to have ssl. But in your article, you say "Just to reiterate, do not need the Heroku SSL endpoint addon".
Heroku provides you with SSL for free, via https://your-app.herokuapp.com. The Heroku SSL endpoint addon is adding SSL to a custom domain.
Yes, but.
Cloudflare in "Full SSL (Strict)" mode will only talk to heroku if they present a cert for the custom domain.
Everything does work in "Full SSL" non-"Strict" mode, except it's not really secure. In this mode CF talks to Heroku over SSL but doesn't verify the cert at all, which means that a man-in-the-middle between CF and Heroku can just present a self-singed cert and would be able to inspect & manipulate traffic.
(It does protect from a passive adversary, so is better that Flexible SSL, and presumably MitM between large cloud companies is harder than a rogue wifi near the user... But it's not truly end-to-end secure.)
I've no idea why CF won't let you configure which domain to expect in Strict mode. It would solve everything give way more impact to their universal free SSL.
Great article, sharing my experiences: 1. Use CF 'Flexible SSL' if you don't have any cert on Heroku. 2. If testing your CF/Heroku setup before you deploy to Heroku, note that prior to deploying, it will respond with 502 bad gateway. So if you see this, your setup is probably all good - If you have not deployed yet and are testing against the 'Heroku | Welcome to your new app!' page. That page responds with a 502 code not 200.
This article was perfect! As I see it now, this is saving me a lot.